Printing a passport photo is not as simple as clicking “Print” on a standard image. Because government agencies use biometric facial recognition software, the physical dimensions, paper quality, and color accuracy must be perfect.
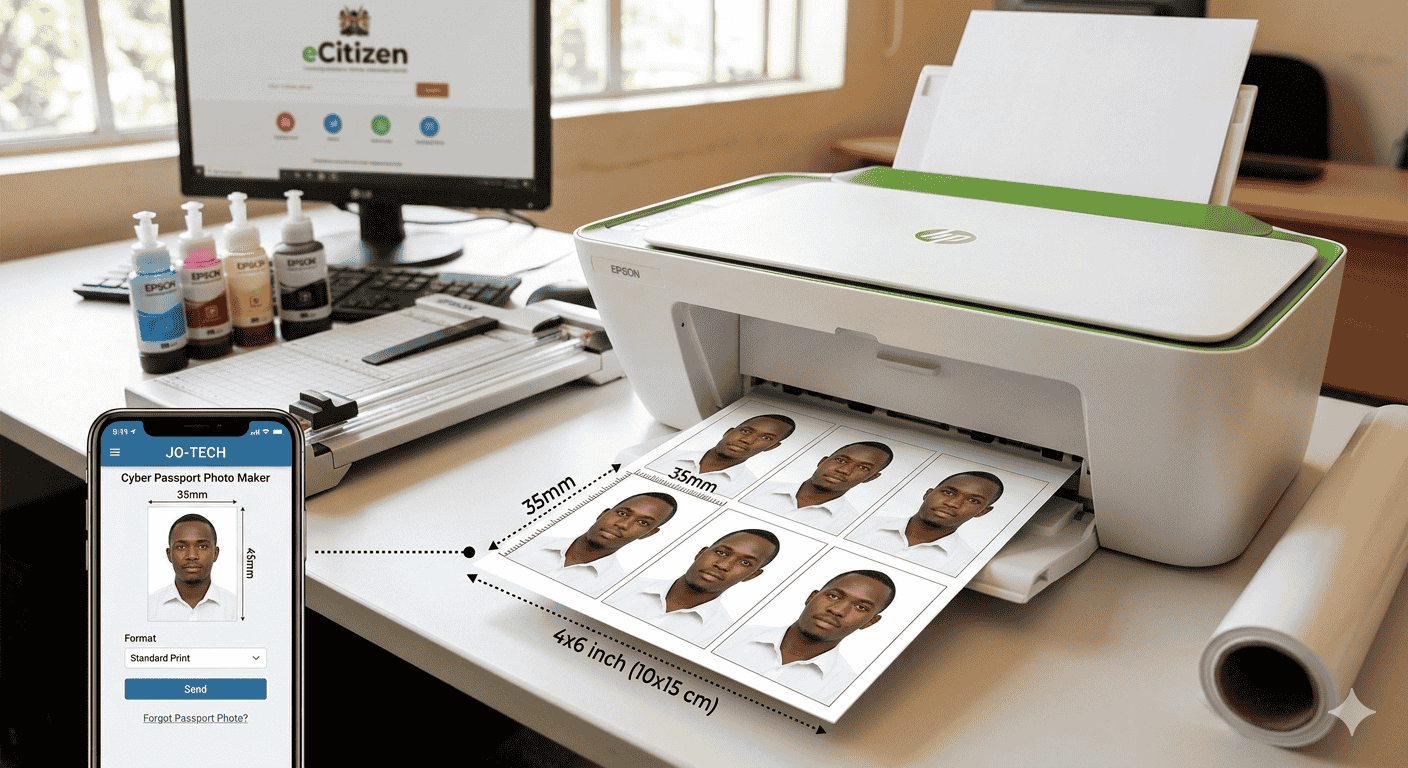
Before you begin the printing process, you must ensure your digital file is correctly formatted. You can create passport size photo online free using our specialized tool to get the exact 35x45mm or 500x500px ratio required for Kenyan documents like eCitizen, HELB, and more.
5 Simple Steps to Print Professional Passport Photos
Step 1: Prepare the Right Hardware and Media
To achieve professional results, you cannot use standard office bond paper. You require specific hardware and consumables:
- The Printer: An inkjet printer with high DPI (Dots Per Inch) capability is essential. In Kenya, the Epson L-series (like the L3210 or L8050) is the industry standard for cyber cafes due to its precision ink system.
- Photo Paper: Use “Glossy” or “Semi-Gloss” photo paper. For passport photos, a weight of 180gsm to 250gsm is ideal. This thickness ensures the photo meets official government standards for durability.
- Ink Quality: Ensure you are using genuine inks. Substandard inks often have a “magenta” or “cyan” tint that can lead to your photo being rejected for unnatural skin tones.
Step 2: Calibrate Your Digital Layout
Once you have your high-quality JPG, you need to arrange it for printing. Most photo paper comes in a 4×6 inch (10x15cm) size.
Do not print a single small photo in the middle of a large sheet; this is wasteful. Instead, create a “Print Sheet.” A standard 4×6 photo sheet can comfortably fit six to eight 35x45mm passport photos.
- Open a new document in a program like Microsoft Word or Photoshop.
- Set the canvas size to 4×6 inches (10x15cm).
- Import your cropped passport image.
- Manually set the image size properties to 3.5 cm width and 4.5 cm height.
- Duplicate the image and align them with small 2mm gaps between them for easier cutting.
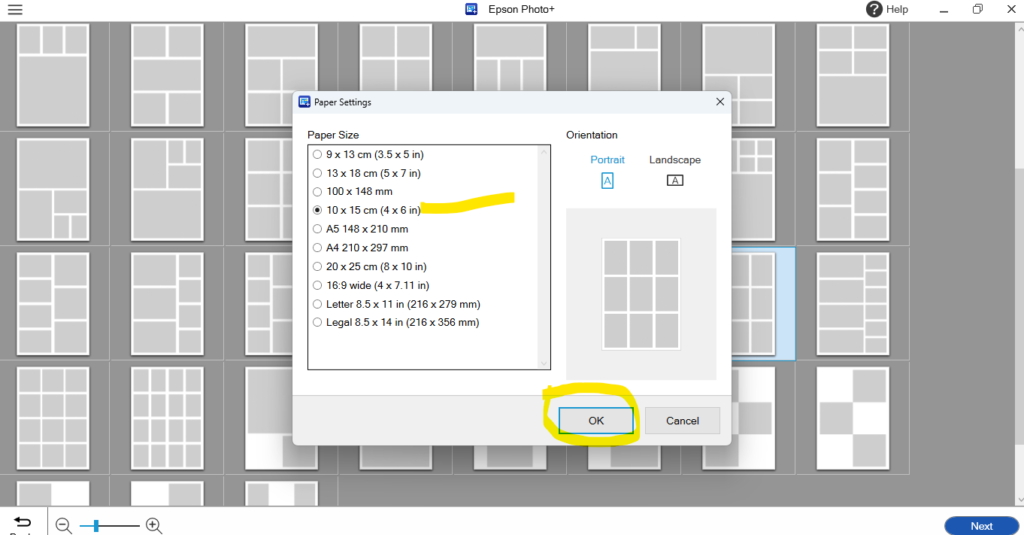
Alternative Method: Using Epson Photo+
If you are using a modern Epson printer, the easiest way to print passport photos is through the official Epson Photo+ application. This software handles the layout for you, ensuring your photos are the correct size and quality without manual resizing.
1. Preparation and Setup
- Install the Software: Download and install the Epson Photo+ application from the official Epson website onto your PC or laptop.
- Connect Your Printer: Ensure your printer is turned on and connected to your computer via Wi-Fi or a USB cable.
2. Configuring Your Layout
- Open the App: Launch Epson Photo+ and select the Photo Print option.
- Select Paper Size: Choose your loaded paper size from the menu. Common sizes include A4 or 10 x 15 cm (4 x 6 in).
- Choose Orientation: Set the page to either “Portrait” or “Landscape” depending on how you want the photos arranged on the sheet.
3. Uploading and Arranging Photos
- Upload Your Image: Click the upload icon to locate and select your passport photo from your computer’s folders.
- Duplicate the Image: Copy and paste the photo within the layout until you have the desired number of copies (usually 6 or 8) ready for printing.
4. Printing and Finishing
- Set Quality Preferences: Adjust the Paper Type (e.g., Glossy or Matte) and set the Print Quality to “High” or “Fine” for the best results.
- Print: Click the Print button. Your Epson printer will handle the alignment and color processing automatically.
- Final Cut: Once the ink is dry, remove the printout. Use a paper cutter or a sharp pair of scissors to carefully cut out each individual passport photo.
Step 3: Configure Printer Settings for Manual Printing
If you are not using Epson Photo+ and are printing manually, follow these specific settings in your print dialog box to avoid errors:
- Paper Type: Select “Premium Glossy” or “Photo Paper Glossy.” This tells the printer to apply the ink more precisely.
- Quality: Set this to “High” or “Best.” Avoid “Standard” or “Draft” modes.
- Borderless Printing: Turn this OFF. Borderless printing often “stretches” the image slightly to fill the edges of the paper, which will ruin your 35x45mm dimensions.
- Scaling: Ensure “Scale to Fit” is unchecked. It must be set to 100% or “Actual Size.”
Step 4: Perform a Test Print
Before using your expensive photo paper, do a test run on a plain piece of A4 paper. Once printed, take a physical ruler and measure the image.
- Is the width exactly 35mm?
- Is the height exactly 45mm?
- Is the face centered?
If the measurements are correct, load your glossy photo paper into the tray. Make sure the shiny side is facing the correct direction for your printer’s intake.
Step 5: Drying and Cutting Techniques
Freshly printed photos are “wet” for a few seconds. Even if they look dry, the ink needs time to bond with the glossy coating to prevent smudging.
- Wait: Let the sheet sit for at least 60 seconds before touching the surface. Touching it too early causes permanent fingerprints.
- The Tools: Use a heavy-duty paper guillotine or a sharp pair of long-blade scissors. For the most professional finish at a cyber cafe, a Passport Photo Die Cutter (a hand-punch tool) is recommended.
- The Cut: Cut just inside the border lines. Any white sliver left on the edge of the photo can make it look unprofessional and may lead to rejection by immigration officers.
Step 6: Verifying Compliance for Kenyan Portals
If you are printing these photos to be scanned back for an eCitizen or HELB passport size upload, stop. It is always better to use the original digital file from our passport size photo maker.
However, for physical submissions (like those for the Kenyan Passport or specialized Visas), check the following:
- Shadows: There should be no shadow behind the ears or on the background.
- Brightness: The face should be clear and not “washed out” by too much flash.
- Background: The background must be pure white. If your printer produces a grayish or blueish background, perform a nozzle check and head cleaning.
Summary Checklist for Success
| Action | Technical Requirement |
| Original File | Cropped to 35x45mm |
| Paper Choice | 200gsm+ Glossy Photo Paper |
| Software | Epson Photo+ (Recommended) or Manual Layout |
| Actual Size | 3.5cm x 4.5cm (Verified with a ruler) |
| Finish | Pure White Background, No Smudges |
By following this step-by-step tutorial, you ensure that your documents are accepted the first time. Whether you are a student preparing your helb passport size photo or a business owner helping a client with their eCitizen upload, precision is your best friend.
Always remember that a passport photo is a legal identification document. Treat the printing process with the same level of care that the Immigration Department uses when inspecting it.